
Signs of Bacterial Contamination in Homemade Dog Treats

Last Updated: November 20, 2026
Quick Summary
Signs of bacterial contamination in homemade dog treats include fuzzy mold, dark spots, sticky or damp surfaces, and sour, musty, or rancid smells. But Salmonella and Listeria can be present with no visible or smell warning at all, so discard any batch that sat out over two hours or was stored damp.
Spoilage shows as mold, discoloration, or off-odors, while bacterial contamination can look and smell completely normal.
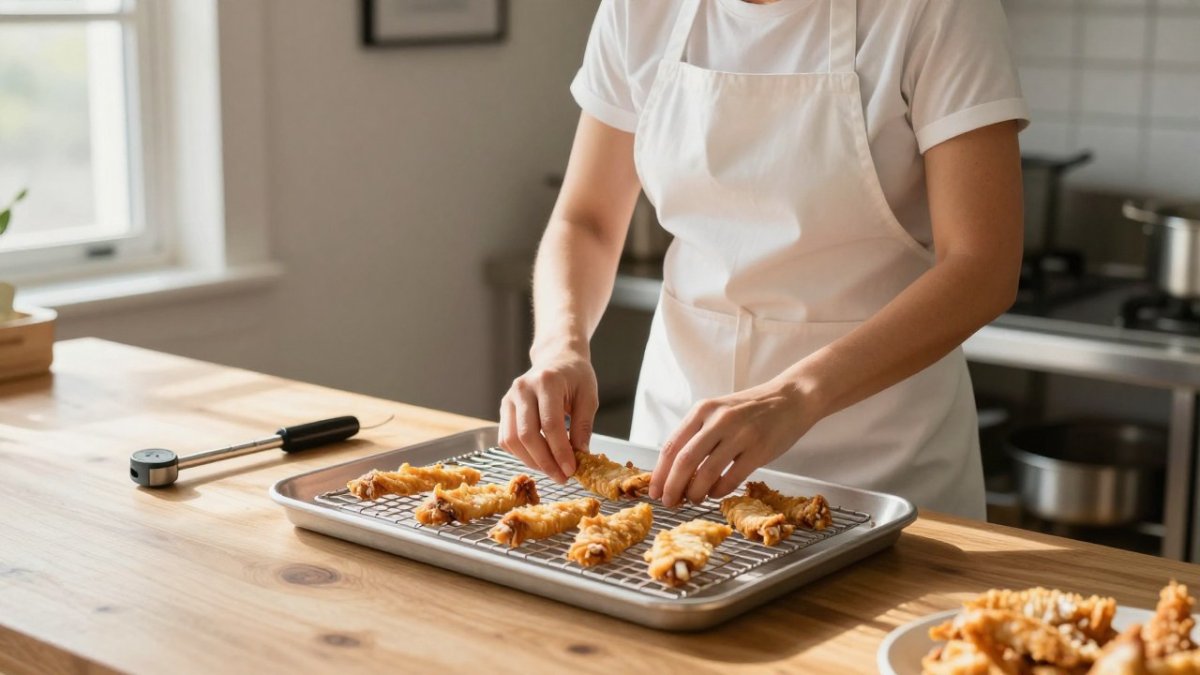
Cool treats completely on a wire rack in a single layer before storing, since trapped steam causes early mold.
Dry crunchy treats keep 1-2 weeks in the fridge; meat-based treats keep only 3-5 days.
Discard any batch left at room temperature more than two hours or showing condensation inside the container.
Freezing pauses bacterial growth but does not kill pathogens, so it is not a safety fix.
Worried about bacteria in your dog's treats?
Five Local Dogs makes small-batch, single-ingredient dehydrated chicken treats with no preservatives.
Table of Contents
Why Homemade Dog Treats Carry Hidden Bacterial Risks
Homemade dog treats feel safer than store-bought. You know what went into them, you baked them yourself, and there's no long list of additives. But that same freshness is exactly what makes signs of bacterial contamination in homemade dog treats so easy to miss. Home kitchens carry risks that commercial kitchens work hard to control.
Most homemade treats skip the preservatives that slow bacterial growth. They also skip the testing that catches pathogens before a batch ships. So the food safety job falls entirely on you.
A treat can look, smell, and taste completely normal and still carry harmful bacteria. Salmonella and Listeria don't announce themselves. That's why you need to watch handling and storage as closely as you watch the food itself.
Below, we'll walk through the visual and smell checks, the symptoms to watch for, and a step-by-step protocol for safe handling. We'll also show you what to do if your dog eats something suspect.
Signs of Spoiled Dog Treats: A Visual and Smell Checklist
The first line of defense is your own senses. Spoiled dog treats usually show at least one warning sign before they become dangerous. Run through this checklist before you feed any homemade batch.

Visible Mold, Discoloration, and Texture Changes
Look closely before you hand over a treat. These changes are your clearest early warnings:
Fuzzy patches in white, green, blue, or black
Dark or gray spots that weren't there when baked
A dull or faded color compared to fresh batches
Sticky or tacky surfaces
Soft spots in a treat that should be firm
Dampness or moisture beads inside the container
Crumbling that doesn't match the original texture
Any one of these means the batch is done. Mold can spread roots deep into a treat, so cutting off the visible part isn't enough.
Sour Smell, Rancid Odor, and Dampness
Your nose catches what your eyes miss. A fresh batch smells like its ingredients. A spoiled batch tells you something's wrong.
Watch for a sour, musty, or yeasty smell. Rancid odors signal fats that have gone bad. A sharp or chemical scent is another red flag. And if you open the container and feel damp air or see condensation, moisture has moved in.
Moisture is the enemy here. Bacteria need water to grow, and a damp container is a breeding ground.
Bacterial Contamination vs. Ordinary Spoilage: How to Tell the Difference
This is where most guides get vague. Spoilage and contamination are not the same thing, and the difference matters.
Spoilage is when food degrades. Mold, off-colors, and rancid smells are spoilage signs. Spoiled food usually looks and smells wrong, so you avoid it naturally.
Bacterial contamination is when harmful pathogens like Salmonella or Listeria are present. Contaminated food can look and smell perfectly fine.
That gap is the danger. You can't rely on your senses to rule out pathogens. A treat that passes every visual and smell check can still make your dog sick.
So treat those checks as a first filter, not a guarantee. If a batch sat out too long, got handled with unwashed hands, or was stored damp, assume risk even if it looks perfect. When in doubt, throw it out. A wasted batch costs far less than a vet visit.
Dog Food Poisoning Symptoms to Watch For
Knowing the symptoms helps you act fast. Dog food poisoning symptoms usually appear within hours to a few days after eating contaminated food. The window varies by pathogen.
Digestive Signs: Vomiting, Diarrhea, and Abdominal Pain
The gut is usually hit first. Watch for:
Vomiting, especially repeated episodes
Diarrhea, including bloody diarrhea
Abdominal pain or cramping
Loss of appetite
Increased gas or gurgling
Mild stomach upset can settle on its own. Repeated vomiting or bloody diarrhea needs a vet, and fast.
Systemic Signs: Fever, Lethargy, and Decreased Appetite
Some infections move beyond the gut. These signs are more serious:
Fever
Lethargy or unusual tiredness
Refusing food for more than a day
Weakness or wobbliness
Dehydration, shown by tacky gums or reduced urination
Young puppies, senior dogs, and immune-compromised animals are most at risk. If your dog shows any systemic sign, call your vet.
How Long Do Homemade Dog Treats Last?
There's no single answer. How long homemade dog treats last depends on moisture, ingredients, and storage. A dry, crunchy treat keeps far longer than a soft, moist one. The single biggest variable is water activity, the amount of free water available for bacteria and mold to use. A fully baked, dry biscuit has little free water; a soft, meaty treat has a lot.
Storage by Recipe and Moisture Level
Match your storage to the recipe. Here's a practical guide:
Treat Type | Fridge | Freezer | Pantry |
Dry, crunchy baked treats | 1-2 weeks | 2-3 months | 1 week in airtight container |
Soft or chewy treats | 1 week | 2 months | Not recommended |
Meat-based treats | 3-5 days | 2 months | Not recommended |
Dehydrated single-ingredient treats | Follow package guidance | Follow package guidance | Airtight, cool, dry |
Always label the batch with the date you made it. For a deeper look at storage windows, see our guide to the shelf life of small batch treats.
Cooling, Moisture, and the Discard Decision
The storage clock starts when the treat is fully cool, not when it comes out of the oven. Trapped steam is the most common cause of early mold in homemade batches. Spread treats in a single layer on a wire rack and let them reach room temperature before they go into any container. If you seal them warm, condensation forms on the lid and inside the container, and that moisture feeds bacteria and mold.
Moisture level should drive your storage choice more than the calendar does. A treat that bends rather than snaps, or that feels cool and damp in the center, is a higher-moisture product and belongs in the fridge or freezer. A treat that snaps cleanly and feels dry throughout can go in an airtight pantry container. When a recipe is borderline, treat it as the moister category, the cost of refrigerating is small, and the cost of a spoiled batch is a sick dog.
Discard decisions should be conservative. If a batch has been out at room temperature for more than two hours, if the container shows condensation, or if you can't remember when you made it, throw it out. A common pattern is that people keep a batch "just in case" long past the point where it was safe. The batch is cheap to replace; a vet visit is not.
Watch out: freezing pauses bacterial growth but does not kill pathogens. A contaminated treat that goes into the freezer and comes back out is still contaminated, so freezing is a storage tool, not a safety fix.
Safe Handling of Homemade Dog Treats: A Step-by-Step Protocol
Good habits prevent most problems. Follow this protocol every time you bake, store, or serve homemade treats. The steps below are written for a home kitchen, where the risks differ from a commercial facility: you don't have separate prep rooms, you're often working with raw meat and flour on the same counter, and you may be baking for one dog rather than a production line.
Wash your hands with soap and warm water before and after handling treats or raw ingredients. This is the single highest-value step, and it's the one most often skipped between tasks.
Sanitize surfaces and tools before you start, including bowls, cutters, and counters. A common pattern is to wipe the counter but forget the rolling pin, the cookie cutter, and the knife handle.
Keep raw meat separate from ready-to-eat items to avoid cross-contamination. Use a dedicated cutting board for raw meat, and don't set cooked treats on a surface that held raw ingredients without cleaning it first.
Cook or dehydrate fully to the recipe's target, and don't cut the time short. Underbaking is a leading cause of contamination in homemade treats because the center doesn't reach a safe temperature. Use a food thermometer on meat-based recipes rather than relying on browning.
Cool completely before storing, since trapped steam creates moisture. Spread treats on a wire rack in a single layer so air can move around them.
Store in an airtight container in a cool, dry place, or refrigerate and freeze as needed. Match the container to the moisture level of the recipe.
Label with the date so you always know the batch age. A piece of masking tape and a marker is enough.
Wash bowls and storage containers between batches. Reusing a container that held an older batch without washing it can carry contamination forward.
Discard any batch that shows spoilage signs or sat out too long.
Watch out: the most common mistake is storing treats while they're still warm. That trapped moisture shortens shelf life and invites mold. The second most common is tasting the dough or the finished treat, never taste homemade treats made with raw meat or raw egg, because the pathogens that affect your dog can affect you.
Ingredient handling matters as much as the baking step. Raw egg, raw meat, and unpasteurized dairy are the highest-risk ingredients in homemade treats. If a recipe calls for raw egg, consider whether a cooked or pasteurized substitute works. Flour is also a raw ingredient that can carry pathogens, so keep it away from finished treats and clean the counter after rolling out dough. Cross-contamination in a home kitchen usually happens through hands, utensils, and countertops rather than through the air, which is why the cleaning steps above are repeated between tasks rather than done once at the start.
What to Do After Suspected Exposure: A Step-by-Step Response
If you think your dog ate a contaminated treat, don't panic. Act quickly and in order.
Remove the treat from your dog's reach and set it aside in a sealed bag.
Note the time your dog ate it and how much.
Watch for symptoms over the next 12 to 72 hours.
Call your vet if any symptoms appear, and mention the suspected treat.
Keep your dog hydrated with fresh water.
Wash your hands after handling your dog or the suspect food.
Save the batch and packaging in case your vet wants details.
Don't induce vomiting unless your vet tells you to. And don't wait for symptoms to get bad before calling. Early action is safer.
Protecting the People Who Handle the Treats
Foodborne illness isn't just a dog problem. The people handling contaminated treats can get sick too. Salmonella and other pathogens spread through hands, counters, and utensils.
Follow the same food safety rules you'd use for your own meals:
Wash hands after touching treats or raw ingredients
Clean counters and tools with hot, soapy water
Never taste homemade treats made with raw meat
Keep treats away from human food prep areas
Wash your dog's bowl regularly
Households with young children, pregnant people, or immune-compromised family members should be extra careful. Handwashing is the simplest, most effective safeguard.
When to Call Your Veterinarian
Call your vet right away if your dog shows serious signs. Don't wait to see if things improve.
Reach out immediately for:
Repeated or bloody vomiting or diarrhea
Fever or obvious lethargy
Refusing food or water for more than a day
Signs of dehydration
Any symptoms in a puppy, senior, or immune-compromised dog
For a fuller picture of canine digestive health, our complete guide to canine digestive health explains what these symptoms can mean. Your vet is always the best judge of what your dog needs.
Choosing Treats You Can Trust Between Batches
Making treats at home carries real rewards, but it also puts the safety burden on you. If you'd rather not carry that risk, buying from a maker who tests and controls each batch is a smart move. That's where batch testing and careful sourcing matter. Our guide to batch testing for dog treats shows how makers verify safety.
At Five Local Dogs, we make single-ingredient dehydrated chicken treats in small batches. We use no preservatives or coatings, and we source our chicken from farms in the U.S. Every batch is hand-sliced and kept simple, so there's less to go wrong. If you want to see how we source and vet our treats, read why dog owners choose our sourced treats. And for tips on picking fresh treats, our guide to buying fresh dog treats walks you through what to look for.
The gap between a safe treat and a risky one often comes down to handling and sourcing. If you'd rather skip the guesswork, Five Local Dogs makes single-ingredient dehydrated chicken treats in small batches, with no preservatives and no coatings. Our treats are hand-sliced and sourced from U.S. farms, so you know exactly what's in the bag. Get started with Five Local Dogs and feed your dog with confidence.
Frequently Asked Questions
Can homemade dog treats look and smell normal but still be unsafe?
Yes. Salmonella and Listeria do not change the look, smell, or texture of food, so a treat that seems perfectly fresh can still carry pathogens. That is why time and temperature control matter more than your senses. Follow the storage limits for your recipe's moisture level, keep treats refrigerated or frozen when the recipe calls for it, and discard anything past its safe window even if it looks fine. When in doubt, throw it out.
What should I do if my dog eats a potentially contaminated treat?
Remove the remaining treats and bag them for disposal or testing, then note the time and amount eaten. Watch for vomiting, diarrhea, lethargy, fever, or decreased appetite over the next 12 to 72 hours. Call your veterinarian right away if your dog is very young, senior, pregnant, or immune-compromised, or if symptoms appear. Offer small amounts of water to prevent dehydration, and do not give human anti-diarrhea medication without veterinary guidance.
How long do homemade dog treats last, and does storage change that?
Shelf life depends on moisture. Dry, fully dehydrated treats keep in an airtight container at room temperature for about one to two weeks, while soft or meat-heavy treats should be refrigerated for up to a week or frozen for longer storage. Treats containing cooked meat, eggs, or dairy spoil fastest. Label every batch with the date it was made, and check for sour smell, stickiness, or discoloration before each feeding.
How can I reduce the risk of bacterial contamination when making dog treats?
Start with clean hands, sanitized bowls, and a clean work surface. Cook meat and eggs to safe internal temperatures, avoid raw flour, and keep raw ingredients away from ready-to-eat treats to prevent cross-contamination. Cool treats completely before packing, store them in an airtight container, and refrigerate or freeze anything with high moisture. Small batches made often are safer than large batches stored for weeks.
Comments